

Design Thinking 101
A framework for creative problem solving

This is the first in a series of foundational articles that I will reference in other pieces. It’s meant to be a primer to my understanding and use of a variety of skills and frameworks including design thinking, facilitation,and interdisciplinary collaboration to anyone who’s newish to them. Very few of these ideas are original and by me, this is meant to be a roundup of the bits and bobs that I find myself coming back to again and again and want to shine a spotlight on.
I was first introduced to the concept of design thinking 10 years ago in the first year of my undergrad. It’s one of a handful of concepts and tools that has completely changed how I approach pretty much every aspect of my work, from creativity to teamwork to problem solving. While the concept had been around for decades in various forms in the product design and tech worlds and a few universities, I had never heard of design thinking before and wouldn’t hear about it in any other context than my university courses for almost five years. It’s now become fairly commonplace in public education, enrichment programs, and academia, and certain pockets of the corporate world. Yet in other sectors like government it seems to be having a very slow uptake.
What is design, and what is design thinking?
First, let’s clarify what’s meant by the word ‘design’ in this context. Many people hear design and thinking of avant-garde runway fashion, or incredibly impractical living spaces in the pages of architecture magazines. In short, aesthetics. And while aesthetics can certainly be an important part of design, design incorporates so much more than that. Simply put, design is about making things better. It’s about approaching problems and potential solutions with intentionality. Or, as my old professor used to say, “Design is about affecting change in the world.”
OK, so then what is design thinking? Design thinking refers to a process used to approach problems in order to come up with effective and innovative solutions. Design thinking is open-ended and is used to solve problems where there isn’t one objectively correct answer. Problems with a limited number of potential solutions (e.g., how much money should we budget for this project? Where should we order food from to respect everyone’s preferences and dietary restrictions?) aren’t ideal candidates for design thinking.
Why use design thinking?
Having a defined process when confronting a complex problem can be incredibly helpful when you feel overwhelmed, don’t know where to start, or are trying to work collaboratively, all of which are common when facing a complex problem! Having a solid understanding of a process gives you language and a framework to better understand your own thinking and gives you something you can adapt to better suit your needs over time.
A framework for design thinking
In this article I present a version of the first framework I learned for design thinking. While I have since learned and worked with a few others, including the Sprint model from Google Ventures and versions of the Triple Diamond Model, an expanded version of the Design Council’s Double Diamond Model, the one below is what I find myself returning to again and again. I checked with several of my former classmates and we’re fairly sure that this model was developed by Dr. Ed Jernigan to teach problem solving to systems design engineers and other undergraduate students, and is sometimes referred to as the ‘Start Anywhere’ model because while there’s an implied order, the process isn’t necessarily linear and you can flow in and out of it in any stage of a project.
This framework presents five stages: identify the problem, generate ideas, choose, prototype (or implement), and evaluate.

Note: Similar models might use slightly different vocabulary, like problem definition, ideation, decide, test, and revise.
Identify the problem
When in doubt, the best place to start is by identifying (or defining) the problem. This might feel like a ‘well duh’ stage, but trust me, it’s probably the most important, even outside of a defined design thinking process. You could come up with the coolest idea in the world, but if it doesn't address your problem, then you haven’t actually accomplished anything, except hopefully having some fun and learning something. But you’ll still be left grappling with your problem.
Take time to think deeply about your problem and question your assumptions in order to identify the root cause. Solving for a symptom of a problem rather than the cause is less effective and often means you’re just kicking the inevitable down the road, allowing even more issues to pile up in the meantime. If possible, discussing the problem with colleagues or affected users can offer new perspectives into the nuances. A great way to go deeper in your problem is to repeatedly ask ‘why?’ Why aren’t users using a certain feature? Why don’t they see your service as one that is able to meet their needs? Why do they have this need in the first place? Your eventual problem might not be the deepest level if it’s out of your scope, but understanding where it comes from will help you understand the context of your work.
A well-defined problem should be able to be accurately summarized into one statement. Even if you think you know your problem well, take the time to craft a problem statement that clearly describes who is affected, how, and why. Identifying who is affected by your problem is crucial, because in the absence of a clear audience (or user), designers will design for themselves, often limiting the usefulness of the solution.
Identifying the problem should also include identifying any constraints you need to work within. Time and money that you have to develop a solution are common and obvious constraints, but constraints could also be the size or weight of a product in order for it to ship, available materials, maximum computing power or internet speeds, how much it could cost a user, the language level of users, or any necessary prerequisite skills a user would need. Note that constraints don’t just mean the sandbox of resources you as a designer have to play in, but are also driven by the characteristics of your audience.
Importantly, the problem statement should not prescribe the solution. This is especially common when problem statements are formatted as How Might We…? questions. Take these problem questions and statements, for example: “How might we use AI to help users navigate their way to the content they need on our website?” or, “The lack of an AI chatbot makes it harder for users to find the content they need on our website.” In both cases, AI is framed as the solution from the get-go, which misses the actual problem. A more appropriate statement would be, users are unable to find the content they need on our website (or, How might we improve the navigability of our website so that users can quickly find the content they are looking for?). When you already have a solution in mind for your problem, you’re closing yourself off from seeing your problem in new ways, or giving other ideas due consideration.
Of course we all have our biases, especially if we’ve been working adjacent to the problem for some time. This is why having collaborators or colleagues with more distance weighing in from time to time can be helpful, especially if you can’t gather perspectives on the problem directly from users. Another useful tool is a solutions idea parking lot (which is also the namesake of this blog!). A parking lot is basically a place where you ‘park’ solution ideas as they come up to save them for later so you can focus more clearly on the problem. Traditionally it’s a spot on a whiteboard, table, or wall where you can stick an idea written on a post-it, but a word document or page in your notes app can also work well.
If this feels like a lot, it’s because it is! But don’t let that prevent you from starting. You can always come to this step at any time as you learn more about your problem and your users.
Generate ideas
For many people, this is the fun part. It’s where you can finally get all of your solution ideas out and explore the outer edges of what could be possible. Without getting into specific tools, IDEO’s 7 Rules of Brainstorming is a great place to start. I’ll be discussing some of their rules in more detail below.
But first, what is idea generation, or ideation? And is that the same as brainstorming? Most people are probably familiar with some version of brainstorming. Popularized in the 1950s by former advertising executive Alex Osborn, brainstorming is a technique for coming up with creative ideas as a group. Osborn first described brainstorming as a form of ‘applied imagination,” underscoring the importance of creativity in a variety of careers and settings. While Osborn’s exploration of brainstorming was nuanced and specific, over the decades ‘brainstorming’ has come to conjure up a specific image for many people: a group of office workers, often reluctant, sitting around a table and being asked to ‘throw out’ ideas on the spot, casting around to find ‘The One’ that will magically solve all of their problems, which results to them holding back from sharing to avoid looking silly. For this reason, many design thinkers today prefer the more broad term ‘ideation,’ to refer to both this stage and a wide variety of more specific exercises that can be used to generate ideas.
Ideation is a form of divergent thinking: you’re trying to think broadly to explore a wide variety of possible ideas, scenarios, and futures. For this reason, the goal of this stage should be to generate a large volume of ideas, regardless of how ‘good’ or ‘practical’ they are, or even how well they address the problem. This is your opportunity to embrace the wild and the wacky. Because while the original incarnations of wild ideas might not get implemented for practicality, at their core they can resonate with the problem in ways you wouldn't have normally thought of. Additionally, it’s far easier to tame a wild idea and adapt it for your problem and setting than it is to gussy up a mundane idea into something interesting. So, for now, there are no bad ideas.
Just like how we avoided slipping into idea generation before we had a solid problem statement, we need to avoid judging our ideas until we have finished our first push at ideation. The world around us often encourages linear growth, perfection, and risk aversion. We then tend to unknowingly reinforce these ideas in ourselves and others, judging fledgling ideas before they get a chance to fully take form, preventing them from showing us what they have to offer. For this reason, it can be difficult for us to put ourselves into a mindset of no bad ideas, and very easy to slip out of it once we’re there. You will have plenty of time to evaluate your ideas against the problem later, but that’s a whole separate stage for a reason, and should remain as such.
There are several reasons for separating our ideation from evaluation. First, if we’re judging our ideas as we go, then we might be tempted to stop and move on the second we have what we think is a ‘good’ idea. This can leave a lot of unexplored potential on the table. Additionally, what you think is a ‘good’ idea in the moment likely isn’t the most creative idea, as we tend to write down the more obvious ones first and become wilder as we go. Finally, who chooses which idea is ‘good?’ If you’re working in a group and haven’t gotten to the point where you’ve discussed how you’re going to evaluate the ideas and make a decision, then it’s usually the loudest or most senior or powerful person who makes the call, and everyone else feels pressured to fall into line. This can undercut valuable discussion and prevents new ideas from being explored.
Let’s think back to our preconception of brainstorming, with individuals throwing their ideas out for a group to riff on in real time. While building on the ideas of others is incredibly powerful and should be a part of your process, there’s real value to delaying this stage until everyone has had a chance to work on their own first. This is because as soon as you start thinking about the ideas of others, you’ve primed yourself to think in a certain direction, potentially cutting your own ways of thinking short and prematurely converging towards the group. Additionally, starting solo and gathering everyone’s ideas later has the side benefit of creating a more equal playing field between introverts and extroverts, and people who have a tendency to take up more room or attention.
Finally, don’t stop once you feel depleted. The best ideas often surface when you’ve past the point of feeling ‘done’ because all of the obvious things have been said and only the wacky remain.
Choose
For many people this stage is the most straightforward since we tend to be well-practiced in critique compared to creativity. However it can also be anxiety-inducing if there’s pressure to make the ‘right’ decision. So, once again I’ll remind you that we’re aiming for better here, not perfect.
Keep your problem statement or How Might We question close to remind yourself of just what it is you’re trying to solve for, and what your constraints are. This can be a great way to easily see which ideas have the clearest potential. Don’t disregard everything else just yet though; interrogating ideas that aren’t perfect fits but are still alluring can tell you more about your problem and reveal hidden assumptions. Ideas also aren’t fully baked at this stage; now is a great time to riff on near fits or interesting concepts to see how they could potentially work with some tweaking. You can also consider combining similar ideas to marry their strengths, but be warned, this can get out of control fast. Frankenideas can get bulky and lose focus, creating more problems than they solve, taking more resources to realize, and confusing users. This is called feature creep.
Often, you don’t need to pick just one idea. Narrowing down to two or three distinct ideas that can be further developed can give you some time to test them out and refine them before making a final decision. Additionally, ideas don’t die just because you didn’t pick them! Sometimes it can be helpful to return to your ideas later on in the process if the chosen ones didn’t work out like you’d hoped.
Prototype (or implement)
Depending on your setting, sometimes you can safely implement ideas immediately to get real time feedback and adjust from there, but often you’ll want to prototype them first to develop them. Regardless, the key feature of this step is moving from the abstract to the tangible in order to get feedback and gain insights.
When most people imagine a prototype, they often imagine a scale model of a finished physical product that is almost ready to debut. This is only one kind of prototyping! One of my mentors likes to think about prototyping on a set of axes: one set of axes is a spectrum from how polished and detailed a prototype is (low-fidelity to high-fidelity), and the other describes whether it’s for an internal or external audience. The near-finished model is an example of a high-fidelity prototype for an external audience, perhaps used for marketing purposes. While these flashy models can be great communication aids, the kind of prototyping most useful for design thinking is the exact opposite: low-fidelity prototypes, first for internal audiences and later for some testers.
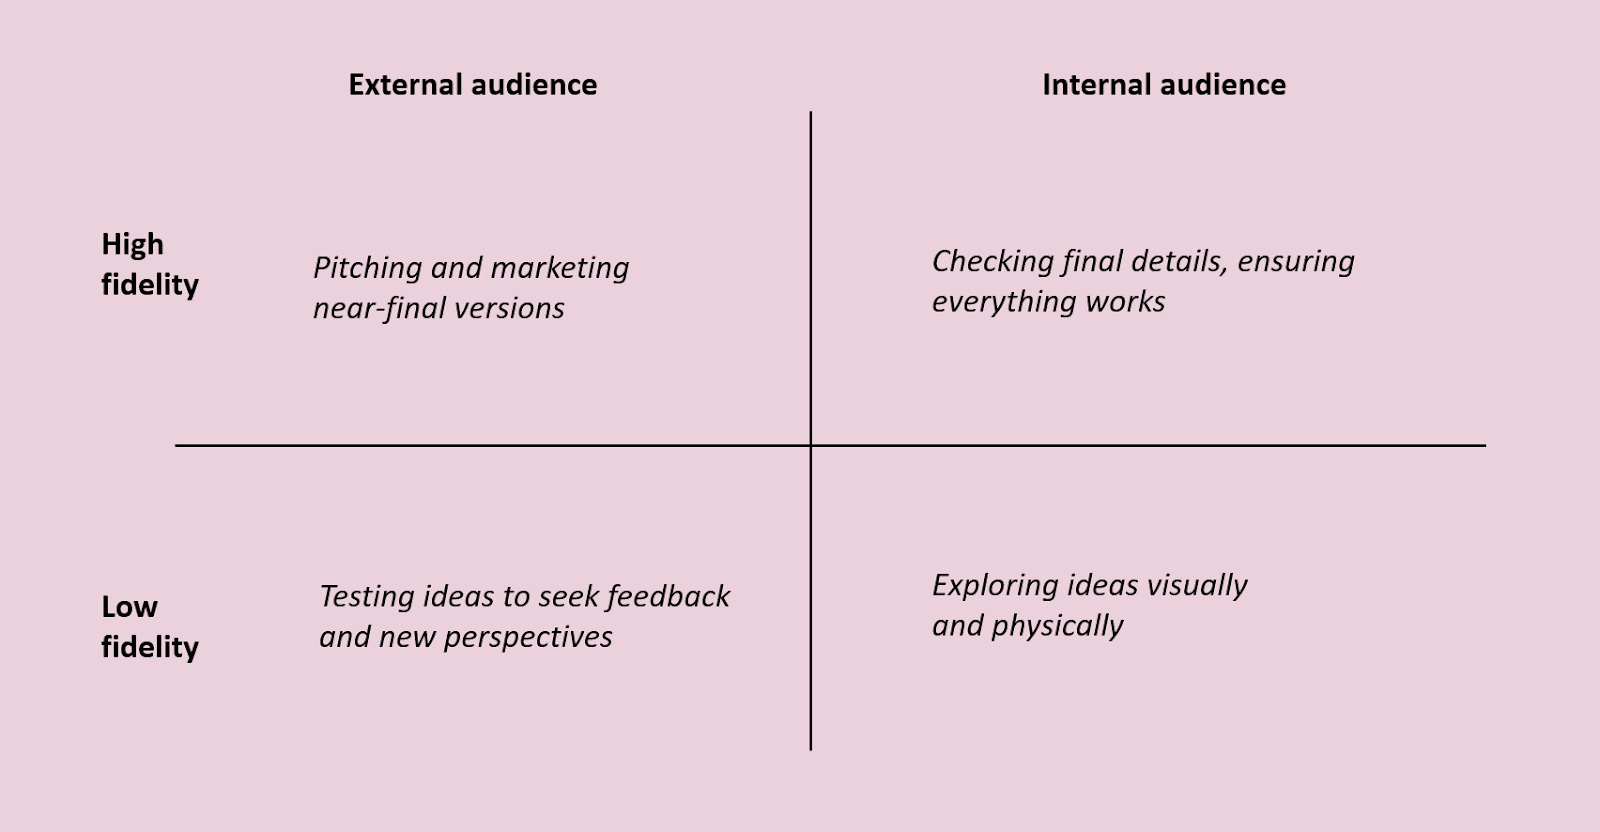
Adapted from Gorbet, S.L., 2020.

Left: Depending on the product, a model being demoed at a launch like an iPhone may be the final functioning product or a high-fidelity prototype. Right: in contrast, low-fidelity prototypes are made with what you have on hand, and focus on allowing you to make your idea tangible. Here, a group of students created a mock-bedroom out of a pillow, sleeping bag, two conference tables, podium, laptop, fan, and bristol board. While you might not want to live in this setup, it does a fantastic job of evoking a bedroom and allowing the designers to explore their idea physically as well as mentally.
Low-fidelity prototyping doesn't mean that you don’t put effort into your work. Rather, you’re using accessible materials, and often making several iterations to try new things as you go.Think printer paper, paper towel rolls, newspaper, masking tape, elastics, markers, scissors, popsicle sticks, clothespins, and cardboard to name a few. These materials are all cheap, widely available, and most of them can safely be cut up or disassembled and put back together.
The thinking behind low-fidelity prototyping is that something doesn’t need to be photo-realistic to communicate an idea and invite feedback. For example, if you’re looking to test a new interface for an app, you don’t need to code a fully functional program in order to figure out the easiest menu format to navigate. This can be quickly and easily simulated by scrawling the options on a piece of paper, whiteboard, or powerpoint slide and then asking someone to talk through as they navigate it to complete an imaginary task. Similarly, if you’re prototyping a new hospital room layout, you might start with boxes and chairs to mark the placement of important machines and allow doctors to walk through to test how intuitive the layout is. In both cases, you can tweak the design quickly in response to feedback to test different scenarios or philosophies. An added bonus of low-fidelity prototyping is that testers tend to feel a lot more comfortable giving honest feedback, since they know it won’t lead to the complete remaking of something that took large amounts of time and money to assemble.
Similarly, you don’t necessarily need to prototype every aspect of your solution all at once. Let’s say you’re working on a new system for managing client profiles. There are a lot of potential things you could prototype here! Client intake, the things the tool tracks, how a user updates the system, or how the system generates reports, just to name a few. Testing that all at once would be quite overwhelming, not to mention it would be difficult to isolate and identify the pain points.
Finally, prototypes aren’t always objects. Experience prototyping is a common way of testing processes and language that can require few physical props. Let’s imagine again that a brick and mortar establishment is reworking their system for managing client profiles, and they want to prototype the onboarding process. In order to test the process, they might ask a friend or family member to come in and play the role of a new client who wishes to open an account while some staff walk them through the process. This might include being invited to sit in a waiting room before being invited into an office, being given a form to fill out, an opportunity to ask questions, or sending them to a different part of the building for follow up. At the end, you might ask the tester about their impressions of the experience, including some follow up questions about what worked well, what didn’t, or whether they were confused at all. Additionally, the team members running the test can offer feedback at the end about whether they could easily gather the information they needed, if the tester reacted the way they expected, and even whether the task could be completed at all.
Evaluation
After you’ve made your prototypes and gathered your feedback, it’s time to evaluate whether your ideas did indeed address your problem. Often it’s not a simple yes or no, but rather determining what went well and what still needs work. In your prototype testing or soft implementation, were there common places where things went in unexpected ways? Why might that be? Did people react to your solution the way you expected? Does the solution idea address the problem in practice? Do you still think you’re solving the right problem?
This stage will often send you back to one or several of the previous four stages. Maybe you made something really cool that people loved, but still didn’t address your problem. Sounds like a fantastic happy accident, but you might need to either redefine your problem or select a different idea to accomplish what you need. Maybe testing revealed that your ideas just don’t quite work in practice. That might indicate another round of ideation could be beneficial. Or maybe your idea worked for the most part, but you think that with some further small changes it could be better. In that case you might continue to test small tweaks to your prototype.
Additional considerations
As the evaluation step implies, an important but often overlooked characteristic of design thinking is that it is iterative. It’s naive and overwhelming to expect yourself to be able to nail it and come up with the perfect solution on the first try. In fact, if you start from a place of assuming that you can get it perfect in one go, you’re setting yourself up for failure because you’re closing yourself off to the learning that’s going to happen along the way (not to mention closing your mind to some of the more creative ideas). The iterations don’t need to be equally long and involved, or even constitute a full cycle. You may even find yourself drifting between them naturally; perhaps watching someone interact with a prototype gives you a completely new idea, or in the process of choosing ideas makes you realize that there’s an aspect of your problem you hadn’t thought of. While progressing forward is often deliberate and momentous, returning to a previous step, even just for a moment, can happen almost unconsciously. Embrace it!
So, when does the design thinking process end? Ideally, you’d live with your solution until you feel like it’s no longer serving you. Maybe it gets retired if the original problem goes away. Or maybe the problem or broader context shifts, which would trigger another iteration of clarifying the problem and trying new solutions. Realistically, if we’re working in the framework of a project with deadlines before something ships or goes live, then you basically keep going until you feel like you’ve addressed the problem or you run out of time.
There’s so much more that could be said on this topic, but this should be enough to get you started and answer some basic questions. So at this point, I invite you to grab some markers and sticky notes and dive in!
most design thinking gets derailed at step one: ego posing as insight.
this breakdown cuts through the noise.
also, parking lot = underrated tool that deserves more airtime.